
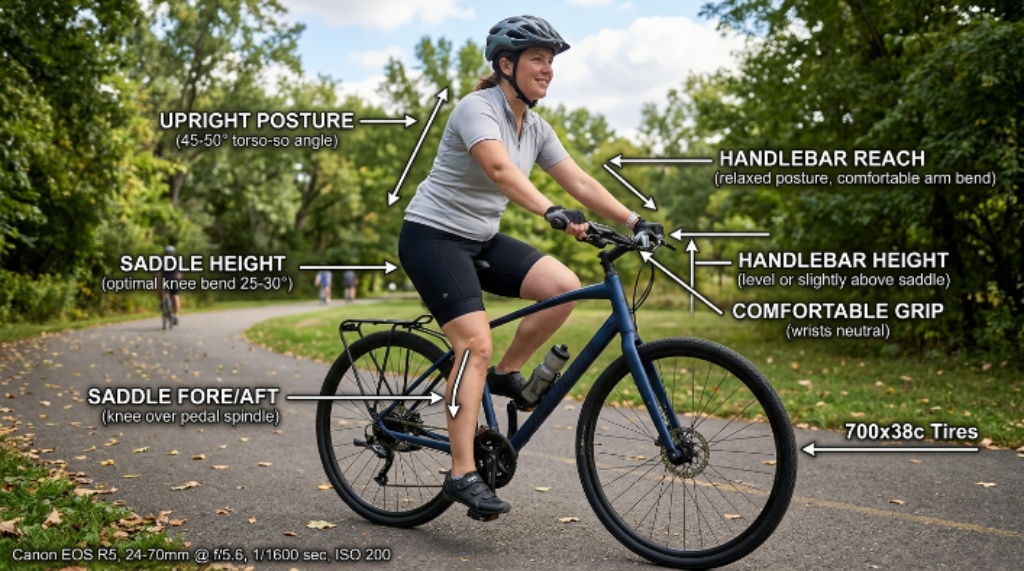
A comfortable hybrid bike starts with four adjustments: saddle height, handlebar position, tire pressure, and overall fit. Set each area carefully, then test the bike during a short ride before making further changes. A small saddle adjustment can change your knee position significantly during every pedal stroke. Likewise, the right tire pressure can improve comfort without making your bike feel sluggish.
Thank you for reading this post, don't forget to subscribe!Hybrid bikes usually combine efficient road style riding with a more relaxed position. Therefore, your setup should balance pedaling efficiency, control, comfort, and stability. This guide explains how to adjust each contact point without complicated measurements. You will also learn how to spot poor fit symptoms and correct them before discomfort becomes a habit.
Start With Your Riding Position
Before adjusting individual parts, consider how you normally ride the bike. Your ideal position depends on distance, terrain, speed, flexibility, and personal comfort. A commuter needs different priorities from someone taking weekend fitness rides.
Start by sitting naturally on the bike while wearing your usual riding clothes. Place your feet on the pedals and keep your hands on the grips. Then notice whether your body feels balanced without supporting your weight through your arms.
A good hybrid bike position should feel stable rather than stretched. Your shoulders should remain relaxed while your elbows stay slightly bent. Meanwhile, your knees should move naturally without excessive side movement.
Check Your Contact Points
Your body contacts the bicycle through several important areas. These contact points include your hands, feet, and sitting bones.
A useful setup should provide:
: Comfortable support beneath your sitting bones
: Even pressure across both handlebars
: Stable foot placement on the pedals
: Easy access to brakes and shifting controls
: A relaxed position for your neck and shoulders
If one contact point carries too much pressure, another area often compensates. Therefore, do not immediately blame the saddle when your hands hurt. Your handlebar height or reach might create the real problem.
Set the Saddle Height First
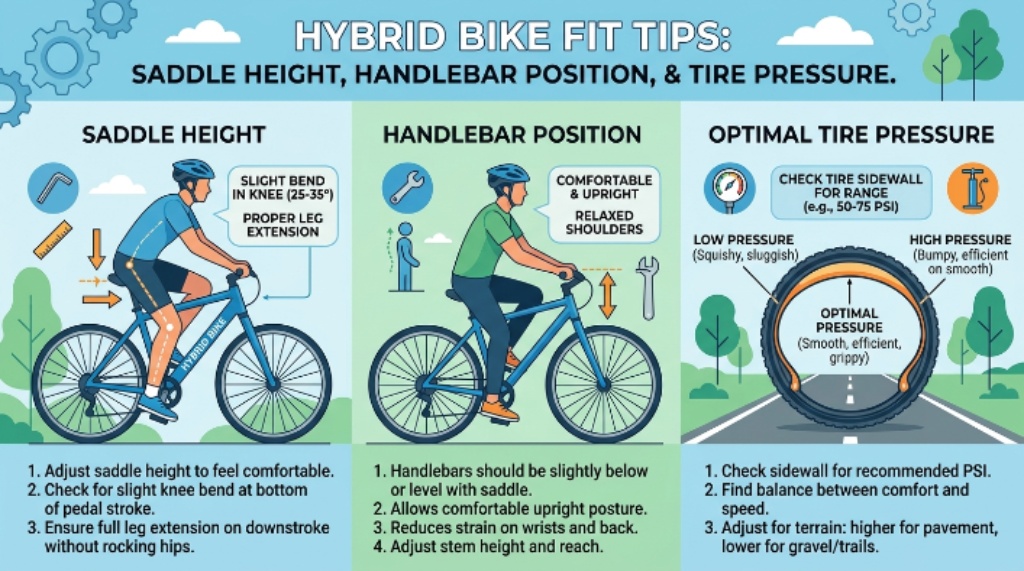
Saddle height provides the foundation for your pedaling position. A saddle that sits too high can cause hip movement and knee strain. Conversely, a saddle that sits too low can make pedaling feel cramped and inefficient.
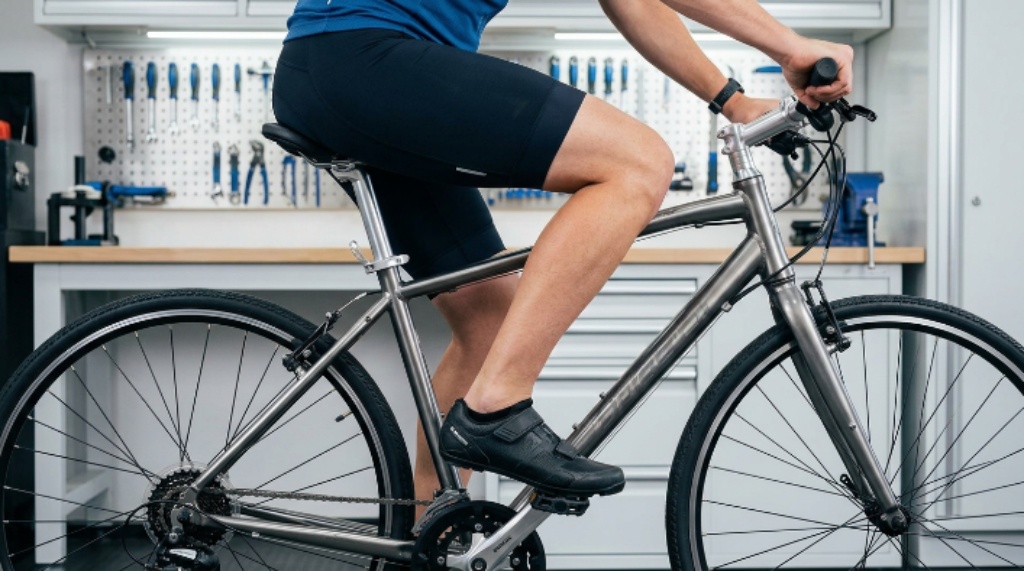
Place the bike on level ground before adjusting the saddle. Sit normally and place your heel on one pedal. Rotate that pedal backward until it reaches the lowest position.
Your knee should become almost straight while your pelvis remains level. If your hip rocks from side to side, lower the saddle slightly. This simple test provides a useful starting position without complicated equipment.
Fine Tune Saddle Height
After setting the starting height, ride for several minutes at an easy pace. Pay attention to your knees, hips, and ability to maintain a smooth pedal stroke.
Lower the saddle slightly if your hips rock during each rotation. Raise it slightly if your knees remain excessively bent at the bottom position. Make small changes because even a few millimeters can affect comfort.
Avoid making large adjustments after every sensation. Give your body enough riding time to evaluate the new position. However, stop immediately if you experience sharp pain or serious discomfort.
Find the Right Saddle Fore and Aft Position
Saddle height controls your vertical position, but saddle placement also affects your reach. Moving the saddle forward can make the cockpit feel shorter. Moving it backward can create a longer and more stretched position.
Begin with the saddle approximately level and centered on its rails. Then ride at a relaxed pace while keeping your hands lightly positioned on the grips. Notice whether your body feels naturally balanced between the wheels.
If you constantly slide toward the handlebar, investigate saddle angle and reach. If you repeatedly push yourself backward, your handlebar position may need attention. Avoid using saddle movement to solve every cockpit problem.
Keep the Saddle Mostly Level
Most hybrid riders benefit from a saddle that sits nearly level. A dramatically downward tilted saddle can make you slide forward. That position often increases pressure on your hands and wrists.
A slightly different angle may suit individual anatomy and riding preferences. Still, make tiny adjustments rather than creating a steep slope. Test every change during a controlled ride before making another adjustment.
Adjust the Handlebar for Better Control
Handlebar height strongly affects comfort and steering control. A higher position generally creates a more upright riding posture. A lower position can feel more aggressive and place greater weight toward the front.
For relaxed hybrid riding, start with a position that allows natural breathing. Your shoulders should stay relaxed rather than creeping toward your ears. Your elbows should maintain a small bend when you hold the grips.
Check Your Reach
Reach describes the distance between your body and the handlebar. Excessive reach can cause shoulder tension, neck discomfort, and hand pressure. Short reach can feel cramped and restrict natural steering movement.
Sit on the bike and hold the grips as you normally would. Your wrists should remain reasonably straight while your elbows stay relaxed. If you constantly reach forward, raise the bar or consider a shorter stem.
Do not automatically install a shorter stem to solve every fit issue. The frame size, saddle position, and handlebar shape also affect reach. A qualified bike fitter can help when several adjustments still fail.
Position the Brake Levers Correctly
Brake lever placement matters because hybrid bikes often support long rides. Your hands should reach the levers without excessive wrist bending. You should also maintain secure control while riding over uneven surfaces.
Sit in your normal riding position and place your fingers over the brake levers. Your wrists should remain mostly straight during braking. Adjust the lever angle until your hands feel natural and relaxed.
Check both sides independently because your hands may not sit identically. After adjustment, test braking at low speed in a safe area. Confirm that both levers remain easy to reach during normal riding.
Choose the Right Tire Pressure
Tire pressure affects comfort, traction, rolling resistance, and rim protection. Therefore, tire pressure deserves as much attention as saddle and handlebar setup.
Never rely solely on the number printed on the tire sidewall. That number usually represents a permitted pressure range rather than your ideal riding pressure. Your tire width, rider weight, road surface, and cargo all influence the best setting.
Start near the middle of the recommended range. Then adjust gradually after testing familiar roads. Lower pressure can improve comfort on rough pavement, while higher pressure can reduce tire deformation.
Balance Comfort and Rolling Efficiency
Many riders assume harder tires always roll faster. Real roads contain cracks, rough patches, gravel, and small obstacles. Excessive pressure can make the bicycle bounce across those surfaces.
A slightly softer setup can help the tire follow the road more effectively. However, extremely low pressure increases the risk of rim strikes and unstable handling. Therefore, seek the lowest pressure that still provides stable steering and adequate protection.
Check tire pressure regularly because air naturally escapes over time. A reliable floor pump with an accurate gauge makes this process much easier. Check pressure before longer rides rather than discovering a soft tire halfway through your route.
Consider Tire Width Carefully
Hybrid bikes commonly accommodate wider tires than traditional road bikes. Wider tires can provide useful comfort and confidence on mixed surfaces.
Choose tire width according to your frame clearance and riding environment. Smooth pavement may suit a moderately narrow tire. Broken pavement, bike paths, and packed surfaces can benefit from additional volume.
Never install a tire that exceeds the bicycle manufacturer’s clearance recommendations. Adequate space around the tire protects against rubbing and debris buildup. Also confirm that your wheels support the selected tire size.
Set Your Cleats or Pedal Position
Flat pedals offer simple foot placement, which suits many hybrid riders. However, riders using clipless systems need additional attention to foot alignment.
Your feet should point naturally rather than forcing an artificial angle. Place the cleat so your foot remains comfortable throughout the pedal rotation. Start with a neutral position before experimenting with more aggressive alignment.
If you experience recurring knee discomfort, inspect cleat alignment carefully. Small changes can alter knee tracking significantly. Persistent pain deserves professional assessment rather than repeated trial and error.
Check Frame Fit Before Making Major Adjustments
Adjustments cannot completely fix an incorrectly sized frame. A frame that feels fundamentally too large or small may continue causing problems.
Stand over the bicycle while wearing normal riding clothing. You should have reasonable clearance between your body and the top tube. The exact clearance depends on the bicycle design and frame geometry.
Then sit on the saddle and reach the handlebars naturally. If every position feels cramped or stretched, investigate frame size. A professional bike shop can assess frame fit before you spend money on components.
Use a Simple Five Minute Fit Check
After adjusting everything, perform one complete inspection. This check helps identify problems that individual adjustments can miss.
Use this sequence:
: Sit naturally and relax your shoulders
: Check that your hips remain level while pedaling
: Confirm that your knees move smoothly
: Check that your wrists remain mostly straight
: Confirm that your brake levers remain easy to reach
: Check that your tires feel stable on your usual surface
Ride for ten to fifteen minutes after completing the inspection. Include gentle climbs, turns, braking, and ordinary pavement. Those conditions reveal fit problems more effectively than sitting stationary.
Diagnose Common Comfort Problems
Different discomfort patterns often point toward different setup issues. However, pain can have multiple causes, so treat these signs as clues.
Neck and Shoulder Pain
Neck tension often appears when the rider reaches too far forward. Excessive handlebar drop can also increase upper body strain. Try raising the handlebar slightly and relaxing your grip.
Numb Hands
Numbness can result from excessive pressure through the handlebars. First check your reach, saddle position, and handlebar height. Then inspect your grip pressure and consider padded cycling gloves.
Knee Pain
Knee discomfort can involve saddle height, saddle position, pedal alignment, or riding technique. A saddle that sits too low often creates excessive knee flexion. Make small changes and monitor your symptoms carefully.
Lower Back Discomfort
Lower back discomfort may indicate excessive reach or an unsuitable saddle position. It can also appear when your riding position changes too quickly. Shorten your rides temporarily while you refine the setup.
Saddle Discomfort
Saddle discomfort does not always mean you need a softer saddle. Excessive pressure can result from incorrect saddle height or handlebar position. Give your body time to adapt while correcting obvious fit problems.
Make Adjustments One at a Time
Changing several components simultaneously makes diagnosis difficult. You may improve one problem while accidentally creating another. Therefore, isolate each adjustment whenever possible.
Start with saddle height because it influences your leg position. Next, check saddle position and handlebar reach. Finally, refine tire pressure and smaller contact point adjustments.
Record each change using simple notes. For example, write down the saddle height and tire pressure before longer rides. This record helps you return to a comfortable setup if experimentation goes wrong.
Prepare Your Bike for Longer Rides
A comfortable short ride does not always guarantee comfort over several hours. Longer rides amplify small setup problems. Therefore, test your bicycle progressively before planning a demanding trip.
Begin with a short local ride and evaluate your body afterward. Increase distance gradually when your contact points remain comfortable. Carry your normal water, tools, and other equipment during these tests.
Extra cargo changes the bicycle’s overall load. You may need slightly different tire pressure when carrying heavier equipment. Keep the changes modest and evaluate handling before committing to longer distances.
Know When Professional Bike Fitting Makes Sense
Many riders can achieve excellent comfort through careful home adjustments. However, persistent discomfort can justify professional fitting. This option becomes especially useful when several changes fail to solve the same problem.
A professional fitter can examine your position while you pedal. They can also assess frame dimensions, flexibility, joint alignment, and riding goals. This approach can reveal relationships that simple measurements overlook.
Do not treat professional fitting as mandatory for every hybrid bike. Instead, consider it when discomfort persists despite sensible adjustments. It can also help riders preparing for frequent commuting or long distance cycling.
Final Comfort Checklist
Before your next substantial ride, inspect the bicycle from front to back. A few minutes of preparation can prevent hours of unnecessary discomfort.
Check these points:
: Saddle height supports smooth leg movement
: Saddle remains secure and nearly level
: Handlebar reach keeps shoulders relaxed
: Brake levers remain easy to access
: Wrists stay comfortable during normal riding
: Tires have suitable pressure
: Tire clearance remains adequate
: Pedal position feels natural
: Nothing moves when you apply normal force
Take a short test ride after every significant adjustment. Comfort should improve gradually rather than depend on one dramatic change.
Conclusion
Setting up a hybrid bike comfortably requires more than simply raising the saddle. Start with saddle height, then refine saddle position, handlebar reach, brake controls, and tire pressure. Make small changes, test each one, and pay attention to how your entire body responds.
A properly adjusted hybrid bike should feel balanced, controlled, and natural beneath you. Use the checklist in this guide before your next ride, then fine tune one area at a time. If discomfort continues despite careful adjustments, visit a qualified bicycle fitter for a more detailed assessment.
Frequently Asked Questions
How high should a hybrid bike saddle be?
Set the saddle so your knee stays slightly bent at the bottom of each pedal rotation without hip rocking.
Should hybrid bike handlebars be higher than the saddle?
Most comfort focused hybrid setups benefit from handlebars positioned level with or slightly above the saddle.
What tire pressure works best for a hybrid bike?
Use the tire manufacturer’s range, then adjust within that range according to rider weight and riding surface.
Why do my hands hurt while riding a hybrid bike?
Hand pain often results from excessive front body weight, excessive reach, poor wrist position, or excessive grip pressure.
How often should I adjust my hybrid bike fit?
Check your setup regularly, especially after changing components, riding habits, footwear, or carrying heavier loads.